OUTREACH – How to – Outreach
Purpose of this SQ How To: To ensure all the colleagues know how to run an outreach campaign from start to finish
Applicable to: Lead Outreach & PR Exec. Content Team are beginning to do this too.
Customers: All
Timescale: Up to 1 day
Introduction
The purpose of outreach is to generate backlinks from relevant third-party websites to the customers website, as well as generate exposure for their brand.
Starting Out
Before starting any outreach campaign it’s important that you have a valuable asset to send out to relevant contacts. Assets can include:
- Infographics
- Thought leadership articles
- Newsworthy articles
- Comment pieces
Once you have a suitable outreach asset, you will need to start building the right type of contacts for the campaign. For the purpose of this guide, we will use an example to show you the process from start to finish of an outreach campaign. In this example, we put together an infographic for Boss Training, a leading provider of health and safety training at height, on health and safety statistics in the workplace.
Once you have your asset ready and signed off by the customer, the next step is to start thinking about who may be interested in receiving the infographic to publish on their website. To do this, start making a list of the types of keywords that may be relevant to the asset. In our example, a few keywords linked to this would be:
- Health and safety
- Safety
- Training
Vuelio and Contact Sorting
Now that we have our keywords ready to go, we can start sourcing some contacts. This task it made much easier as we Vuelio, a media database tool. When trying to log in to this website, please always use this link. Once you arrive on this page, you’ll need to log in using Matt’s credentials, if Matt has not already shared the details with you, go on to Matt’s LastPass and feel free to share the details with your account.
Once in the database, it can be daunting, but it is straight forward to use! Here’s a step by step guide to get your contact list built:
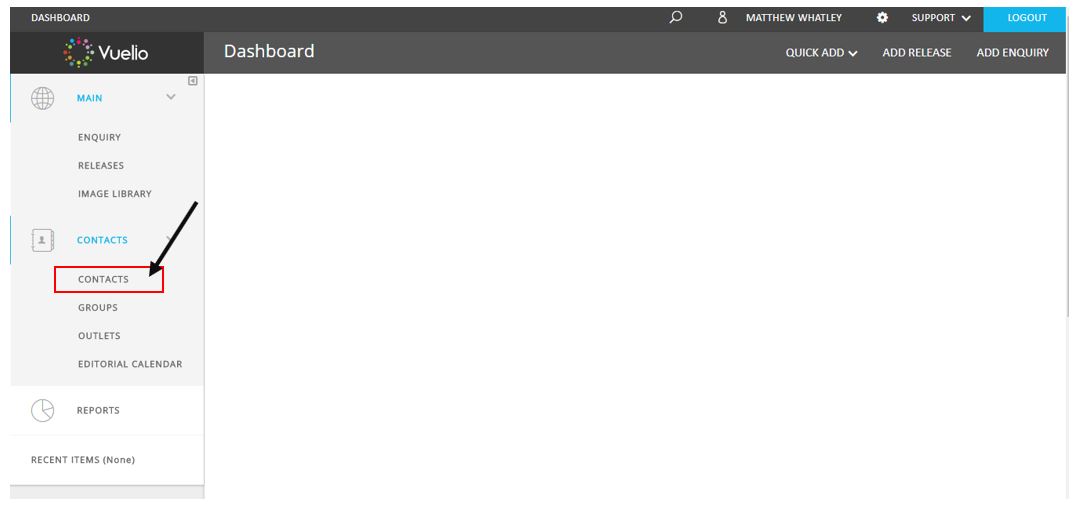
Step 1: Click on ‘Contacts’ on the bar on the left. This will drop down to reveal more options, click on ‘Contacts’ on the drop-down menu.
Step 2: You’ll arrive on the ‘Contact Management’ page, this is where you can start searching for the contacts you’d like. Click in the search box at the top of the page and enter your keyword into this box and hit ‘Search’. This will now return all the results within the database to you.
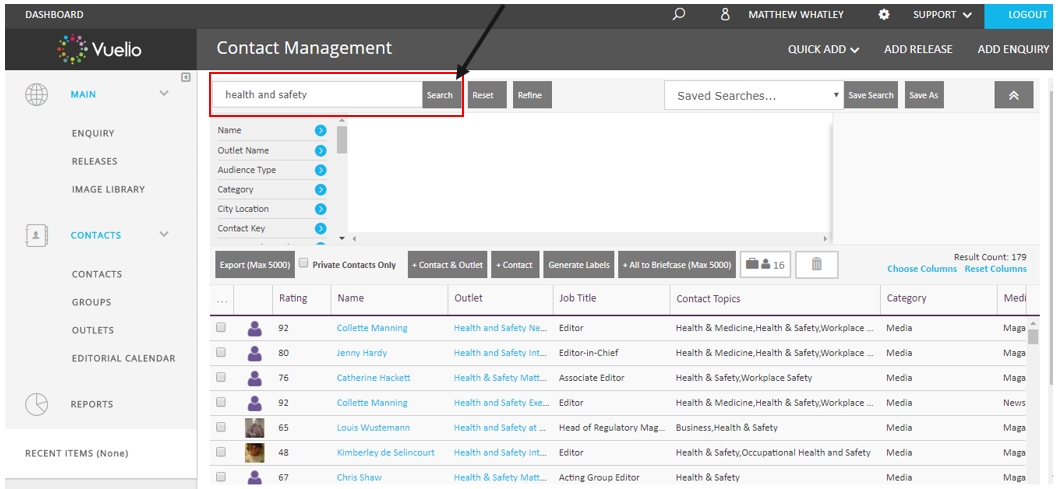
Step 3: Now that you have your contacts, you need to export these into an Excel document to sort and delete unwanted contacts more easily. To do this, click ‘Export (Max 5000)’ and the Excel document will appear as a download at the bottom of your browser. Click this to open the Excel document and move on to the next step.

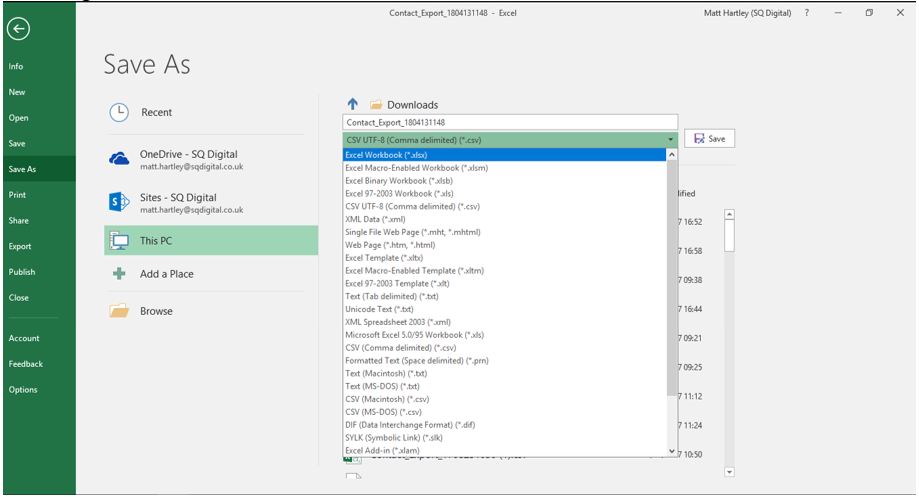
Step 4: REALLY IMPORTANT!!! BEFORE YOU DO ANYTHING ELSE, MAKE SURE YOU SAVE THIS DOCUMENT AS A EXCEL FILE OTHERWISE YOU WILL LOSE ALL YOUR WORK LATER. Go to ‘File’ > ‘Save As’, go to the drop-down menu and save the document as an ‘Excel Workbook’ and make the file name related to the customer you are working for.
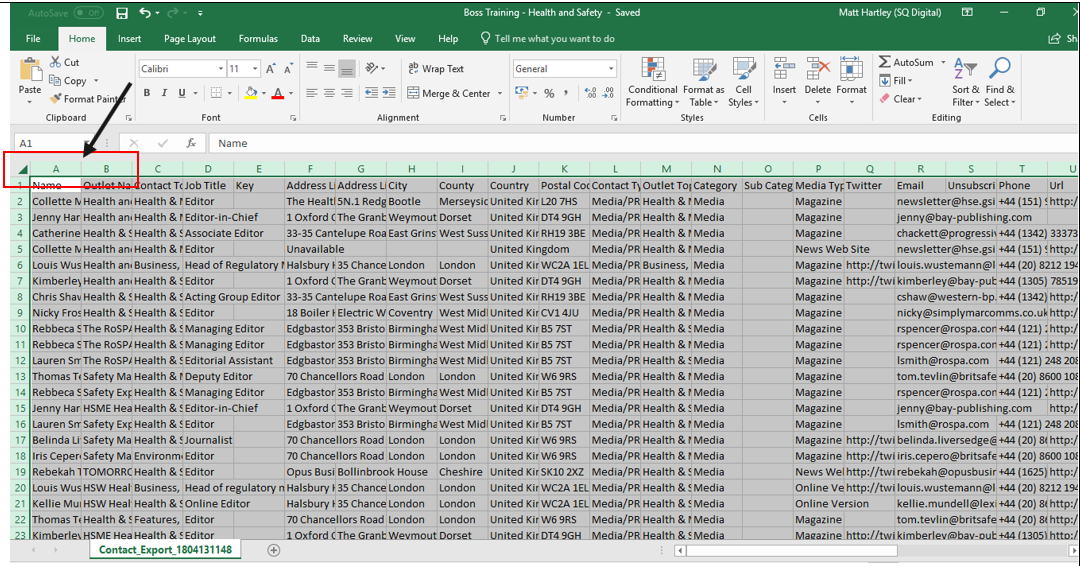
Step 5: Click in the top left corner of the Excel document – this will highlight the whole Excel spreadsheet, then double click in-between the ‘A’ and ‘B’ at the top of the spreadsheet to expand each cell to the appropriate size.
Step 6: Now that you are able to see everything clearly within the spreadsheet, you will need to narrow down contacts to more relevant results. To do this, you will need to click on the ‘A’ at the top of the spreadsheet to select all the contact’s names within the document. Then type ‘remove duplicates’ into the ‘Tell me what you want to do’ box at the top of Excel, then click ‘remove duplicates’ and you should see this:
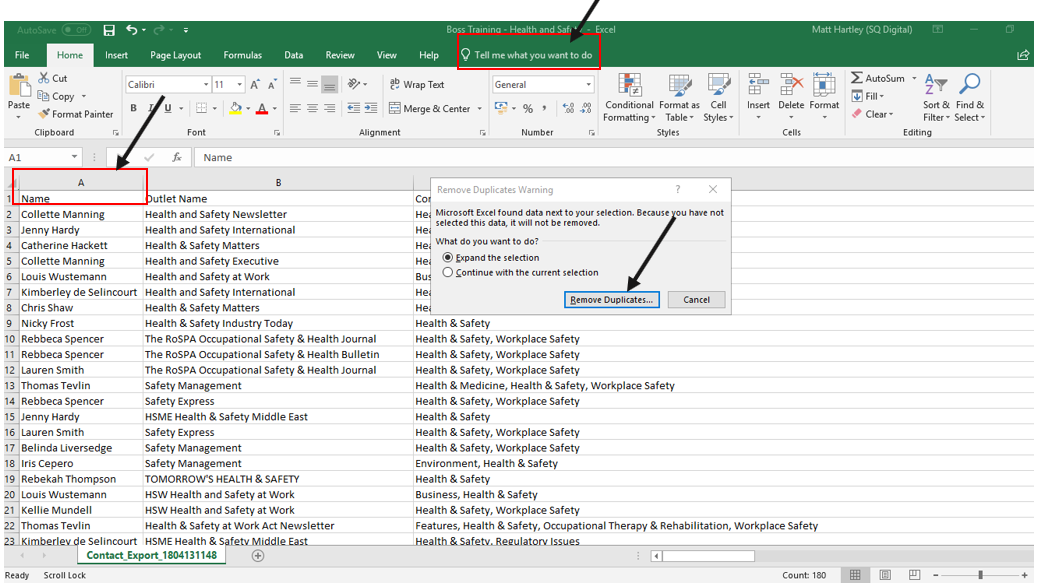
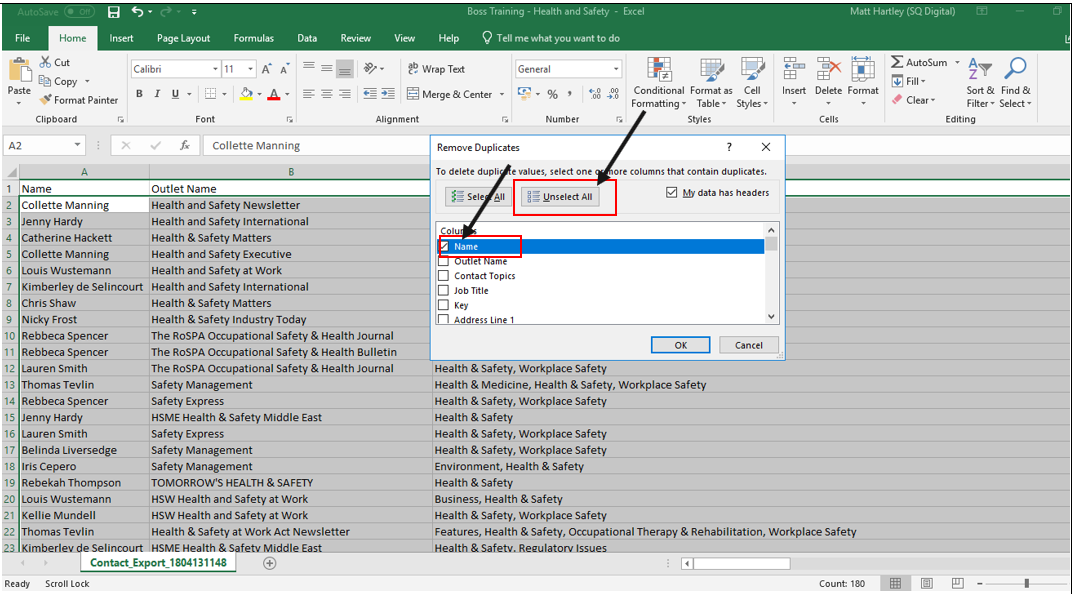
Step 7: Click ‘Remove Duplicates’ in the box, in the next box click ‘Unselect All’ and then re-tick the ‘Name’ box, click ‘Ok’ and this will remove any duplicate contact names from the spreadsheet.
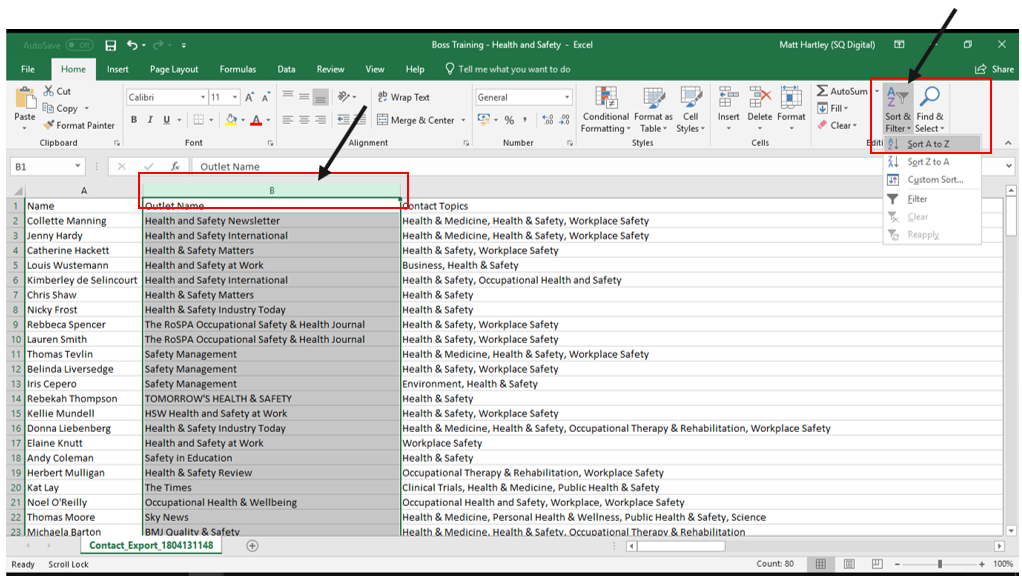
Step 8: Next you need to sort the ‘Outlet Name’ in alphabetical order, this will ensure multiple contacts from the same publication are grouped together. To do this, click on ‘B’ at the top of the Excel document to select all the Outlet Name’s, then click on ‘Sort & Filter’ and finally click ‘Sort A to Z’.0
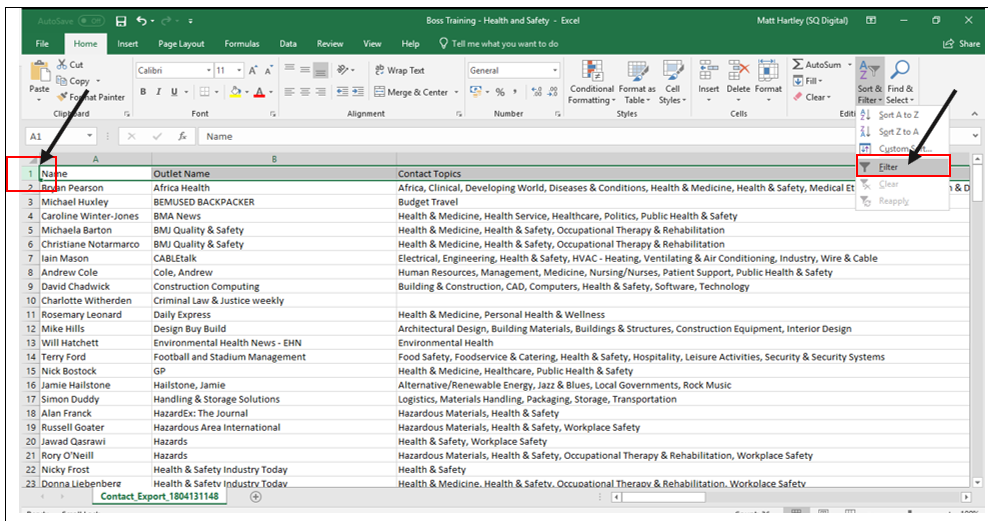
Step 9: Now that you have a slightly neater contact list, we need to filter this further to ensure we’re getting in touch with the right people. To do this, click on ‘1’ to select all the cells across the top of the document, then click on ‘Sort & Filter’ and click ‘Filter’. This will add filters across the top of the document to further sort the contact list.
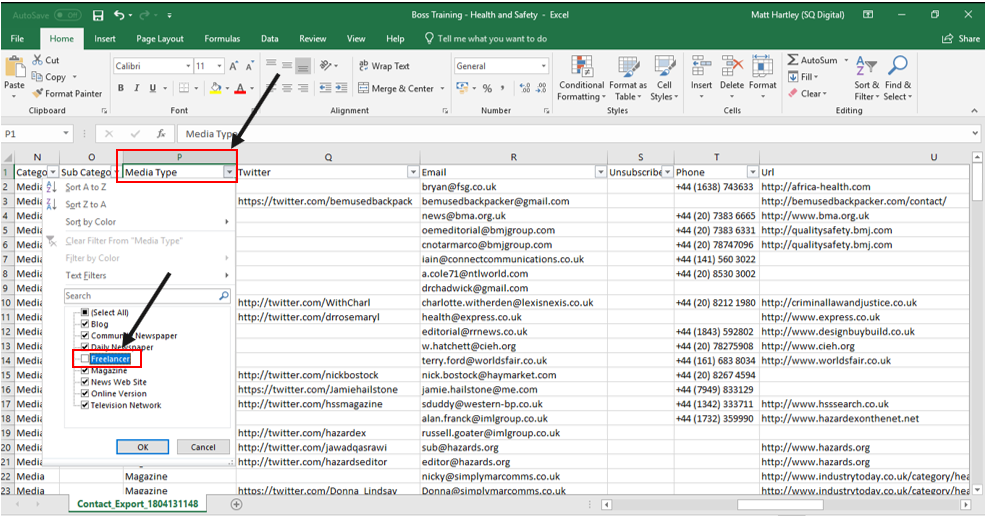
Step 10: Scroll across to cell ‘P’ which should have ‘Media Type’. Click on the drop-down arrow and un-tick ‘Freelancer’ as we do not want to be getting in touch with freelancers in our email outreach.
Step 11: Once you have completed the above steps, go back to cells ‘B’ and ‘C’ and check through the Outlet Name and Contact Topics, in this step, we are having a final check over the contact to see if they are relevant to our customer. If there are any questionable contacts just remove them to be safe. This step is very much up to your own judgement and the customer you are working for. Once you have been through the remaining contacts, save the document and you are now ready to move on to the email outreach section!
Email Outreach
Now that you have a contact list, it’s time to start putting together a template email to use when getting in touch with your contacts. Here’s a template email that was used for Boss Training’s outreach campaign:
“
*Email Subject* – Accident Hotspots in the UK
Good Afternoon (Name of contact),
I’m contacting you today on behalf of Boss Training.
Boss Training have created an infographic on Accident Hotspots in the UK which I feel would be relevant to your publication as you have posted about safe working in the building and construction industry in the past.
The infographic includes; where in the UK can you find the highest number of work-related accidents, injuries and illnesses from up to date figures.
Please don’t hesitate to contact me with any queries.
Look forward to hearing from you soon.”
When putting together your template email a customer’s outreach campaign, try to keep it short, snappy at to the point like the above email. This addresses the key things we want to get across to the contact and nothing more. In outreach, less is more. As for the email subject, again, this is to the point and explains exactly what the asset is.
Once you have your email template, you’re ready to start outreaching to your contacts. To do this, you’ll need to go through your contact list and start emailing each publication individually (if there is less than 200 contacts) using your own template email. Simply copy and paste the email address from your contact list, copy and paste your subject line and template email into the mail and ensure you attach any accompanying documents.
If there is more than 200 contacts, you should bulk email the contacts for time’s sake – use the template email but ensure this is generic. Do exactly the same as above BUT ensure you are only copying across 75 email addresses at once and ALWAYS ensure the email addresses are pasted into the ‘BCC’ section of an email. This is to ensure that all those who are copied into the email cannot see any other contact the email was sent to.
Do this until you have gone through the whole list, and then play the waiting game! It may take some contacts a while to get back, but always ensure you are monitoring your emails to respond to any contacts who may get back. Always try your best to accommodate any requests from contacts (within reason) and NEVER agree to pay for links under any circumstances as this may result in a Google penalty for the customer.
Fingers crossed you will end up with a whole host of publications coming back to you letting you know the asset has been published with a link back to the customers website. This does take time, so ensure you are always monitoring Google and searching for the title of the asset as you may find a story pop up on this without the publication letting you know.
In the event of a publication publishing the asset but not crediting the customer with a link back to their website, drop the publication an email and politely ask for credit for the article in the form of a link back to the customers website. This doesn’t always work, but it’s worth asking!
Once you have been through all of the above steps, you should hopefully have some successes like the below that Boss Training had for their asset:
https://roofing-today.co.uk/t/16PI-5KANQ-615Y3SZB26/cr.aspx
http://www.connectingindustry.com/IndustrialCompliance/accident-hotspots-in-the-uk.aspx
https://www.khl.com/access-international/boss-breaks-down-injury-data-/132194.article
https://www.hsimagazine.com/press-release/accident-hotspots-in-the-uk