SEO – How to – 301 Redirects
Purpose of this How To Guide: To implement 301 redirects in order to resolve any 404 errors.
Applicable to: SEO Executives
Customers: All
Timescale: Dependant on amount of 404s and CMS
Introduction
When crawling a website, Google spiders must have a clear path to follow. So, if a website has too many 404s (page not found errors), it affects their overall ranking. 301 redirects work like a forwarding address, helping to transfer an old URL’s authority and link value to a new URL.
Redirects should be put in place every time a page is taken down, for a product that is no longer stocked for instance, or every time SEOs change the URL for optimization purposes. This guide aims to show you how to carry out and implement 301 redirects.
Locating & Reviewing 404 Errors
In the website’s Google Search Console property, locate the 404 errors by clicking on Crawl > Crawl Errors using the navigation pane situated on the left-hand side.
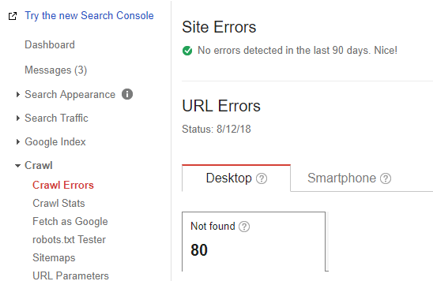
Click the download button to download the 404s as a CSV spreadsheet.
Once downloaded, open the spreadsheet and highlight the entirety of the first column directly beneath ‘URL’. Copy the column and open Screaming Frog.
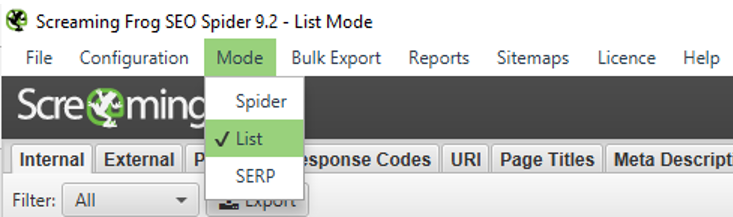
Select the ‘List’ option by going into Mode > List from the menu at the top.
Then select ‘Upload’ and from the dropdown menu that appears, select ‘Paste’. Click OK and wait for the software to crawl the copied links. This will allow you to determine if the 404 errors listed in Google Search Console are genuine or if they respond with a different HTML code e.g. 200, 405, 400 etc.
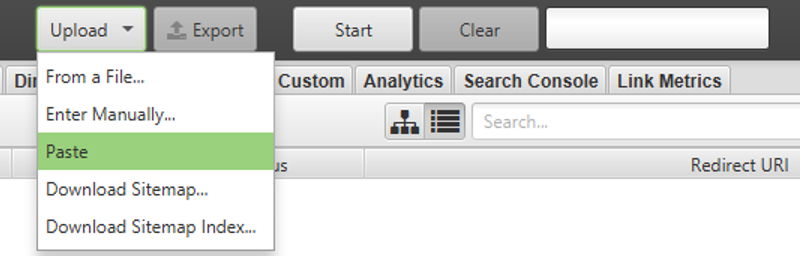
For a full comprehensive list of HTML status codes, see here.
Once the progress bar has reached 100%, click on the ‘Export’ button to export the results to a CSV.
When the spreadsheet opens, you’ll notice that there’s a lot of information. Discard the top two rows of the data and all other columns except for the URLs and response codes.
Highlight both columns, making sure to start in column B (highlight response codes first). Next, order the data from smallest to largest using Excel’s sorting feature located in the top-right-hand corner.
This will allow you to easily remove any URLs that responded with a code other than 404.
When you’ve done this, remove the response code column, highlight the URL column and order it from A – Z (this will make it easier to carry out the task).
Go on to the website and start to find the most relevant pages to redirect the 404s to.
TIPS:
- Make sure to look all over the website before you decide that there isn’t a relevant page to redirect the 404 to.
- Carrying out a site search may sometimes help you find the most relevant page if the website is large (site:https://www.example.com keyword).
- If you can’t find a relevant page to redirect the 404 URL to then redirect it to the homepage.
- Query strings e.g. https://www.example.com/?=ynfksj CANNOT be redirected – these can usually be identified by the question mark in the URL string.
- Parameter/filter URL strings with % symbols in them CANNOT be redirected.
BE AWARE:
- If the website you are working on has recently been hacked, you may see a lot of 404s as a result which is due to the developers removing the injected content. DO NOT REDIRECT THESE as we don’t want to make Google think that we’re associating the website with the hacked content. It might be a better option to block them in robots.txt if they are an issue.
SQ Shop Websites
Due to the volatile nature of SQ Shop websites, you will need to send the list of 301 redirects to the developers. Make sure that you keep the full URLs intact (domain and query string) and send them a document with what URLs need redirecting and where they need to be redirected to.
Once you have compiled your list of redirects, create a D&D Ad Hoc Ticket on Accelo and request that they be implemented. DON’T FORGET to attach the redirects in the attachments tab once the ticket has been created. Also tag the D&D PM to the request as an assignee and in a note explaining what needs to be done for what website.
WordPress Websites
For WordPress CMS’, you will be able to implement the redirects yourself (check to see if you have the necessary permissions before you start a redirects task).
WordPress sites don’t need the whole URL, just the query string. To remove everything you don’t need form your document:
- In your spreadsheet, click on one of the URLs
- Double click on it and highlight the domain e.g. https://www.example.com/keyword. Make sure you include the trailing slash as well.
- Next, press Ctrl + F to bring up the Find & Replace feature
- Paste the domain address into the find box and click on the replace tab in which, you will place a trailing slash (/).
- Click ‘Replace All’.

Save the document (MAKE SURE it’s saved as a CSV file).
Go to the CMS.
Under the settings tab, you should find a plugin named ‘Simple 301 Bulk’ – click on this.
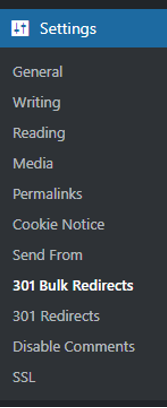
If you cannot find it, ask D&D if you are ok to search and install the plugin. If the answer is yes, make sure it’s compatible with the WordPress version that the website currently runs on before installing and activating it. If the answer is no, ask the D&D team to install the plugin for you.
If you’re unsure, ask a Senior SEO Executive / D&D.
Locate your spreadsheet file on your PC and drag it over to the ‘Choose file’ box on the page.

Upload the spreadsheet.
Once completed, check a selection of the URLs to determine if they have been successfully redirected. You can also select the list of 404 URLs on your spreadsheet and re-run them through Screaming Frog to check if they are still an issue.
TIP:
- You may need to empty the CMS’ cache in order for the redirects to work.
If the CMS is different from WordPress or SQ Shop e.g. Magento / Joomla, or if you need to use FTP (File Transfer Protocol), get help from a senior SEO Executive or your Line Manager who will advise further.