Introduction
Customers receive concepts and themes at point of planning, but the final posts are supplied during their monthly interval. We use Planable to prepare and approve posts for publishing. In this guide we cover the responsibilities of each role involved in Social Media posting.
Notification Settings
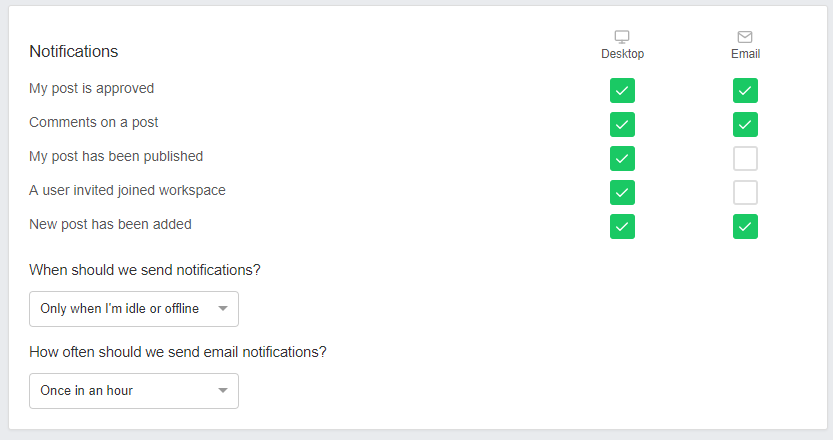
Client accounts are set up with no notifications as default but you will need to customise your own notifications. Its mainly your own preference for what level of notifications you get, to change them visit your account settings:
 And then make your changes in the notifications section. Here are some recommended settings:
Team Discussion
All posts in Planable have an accompanying comments section where you can collaborate and discuss edits to posts. Please ensure that you do 2 things:
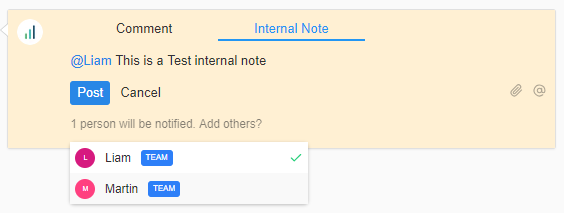
- Keep the comments as an Internal Note unless you specifically want it to be visible to Client accounts.
- When writing comments, ensure you either ‘@’ target the person you want to talk to or click the ‘x people will be notified’ log and select however many people you want to be notified of the comment:
Social Media Executive
Creating Posts
Tasks in Accelo will supply the quantity of posts & platforms required. If a customer requires 12 or less posts a month this will be 1 task to create all the posts for the month. Customers with over 12 posts will have weekly tasks to produce posts for the next week. All posts are created in Planable as visible to the team only, and unapproved.
Ensure that when designing posts, you add a scheduled posting date a minimum of 2 days ahead of when you will be sending them for approval – if you are sending the posts to the Account Manager for approval on the 1st, the earliest scheduled post should be the 3rd.
Proofing Posts
Once the posts are designed they will need proofing before being sent to the Account Manager for final approval.
- Platinum Customers: The Lead proofs the schedule
- Silver Customers: Your Line Manager proofs the schedule
Once you have got the tasks proofed, they will be marked approved (ticked) if they are ready to go. After proofing, notify the customer’s Account Manager, who will offer final approval by marking the posts as visible to all.
Publishing Posts
The Account Manager will have approved posts and marked them as visible to the Client. Any posts on Instagram (or advanced functionality posts on other platforms) will also need to be published natively.
Account Management
Reviewing Posts
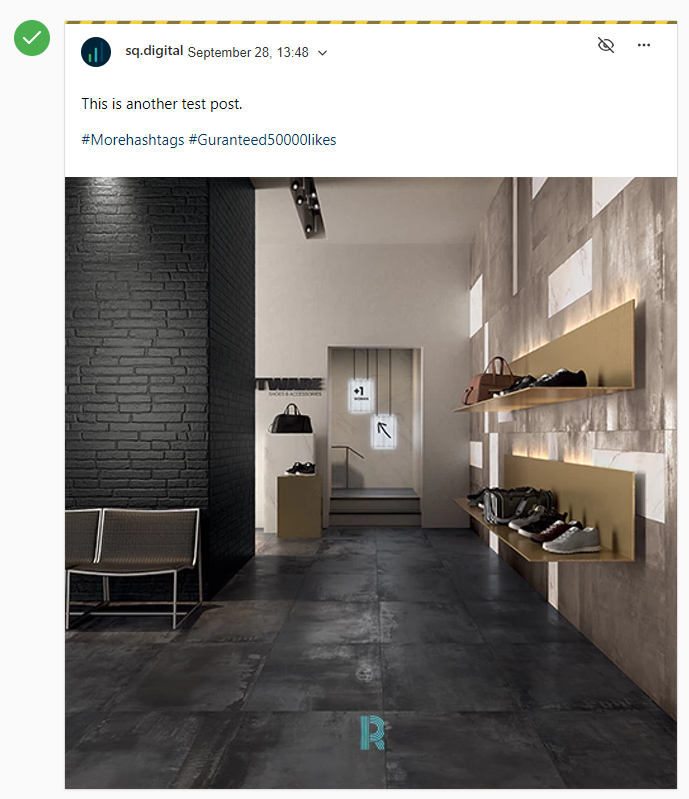
Posts supplied to you are marked as visible to the team only. This is signified by the closed eye and ‘construction’ tape:
Any changes you want can be discussed in Planable, as an internal note.
Once you are happy with your Customer viewing the post, you click the eye to make the post visible to all. Finally, once you have approved the posts as good to go, respond to the Social Media Executive via their note in Accelo letting them know so they can complete their task.
Notifying Customers For The First Time
Once you have your first posts ready and approved for viewing by the Customer, you’ll need to decide if you will want to call the Customer to let them know about Planable or if an email will suffice. Regardless, you need to invite the Customer on to their part of Planable so they can view the posts we are producing.
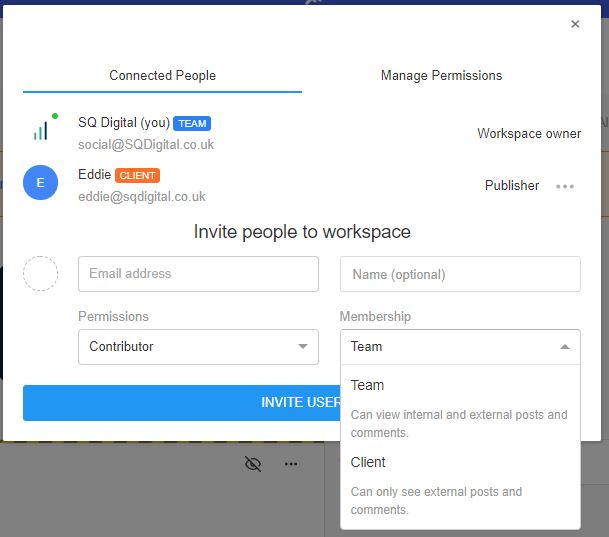
- Ensure you are on the Customers workspace by clicking on ‘Workspaces’ in the top left of Planable and clicking the right account
- In the top right hit the ‘+’ to add a new member to the workspace:

- Fill in your customers contact details and ensure you have marked their account as a Client account
- Once you have invited the user they will receive an email for them to log in and choose a password. Once this is done they have free reign to log in as they wish and make comments on any posts as they please
- The final step for including the Customer to Planable is to make sure they have approval permissions, so they can ‘un approve’ a post. To do this, revisit the ‘Add Member’ screen from step 2 and click ‘Manage Permissions’. From here you can authorise the ability to approve posts:

Planable Notifications
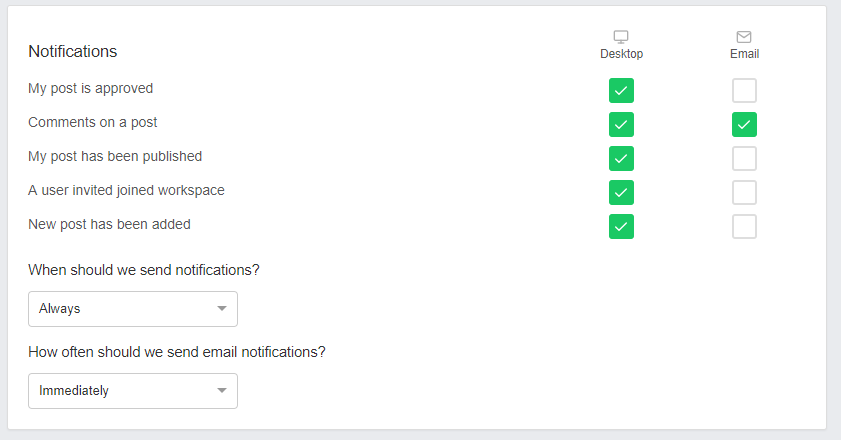
As default, any client accounts will not receive any notifications for posts, unless the client is directly targeted in a conversation in Planable (@client) but if the customer did want a notification for posts as they are marked visible to them then they can do this in their own account settings in the top right:
And select to their preference from there: